Thursday 24 October 2019

Apple Wants to Help Project Catalyst Developers with More Support, Resources


macOS Catalina was launched to the public earlier this month. The latest macOS arrives with Mac Catalyst for everyone. Project Catalyst is aimed at making it easier for developers to port iPad apps to macOS. Apple received criticism from developers who claim that porting is not as easy as made out to be. The company told CNET that it is learning as developers adopt Catalyst.

macOS product marketing director, Todd Benjamin said Project Catalyst is designed to give developers a “huge head start.” He also added Catalyst will throw open new opportunities for developers who can now reach out to macOS users.

Our vision for Mac Catalyst was always to make it easier for any iPad app developer, big or small, to bring their app to the Mac,” said Todd Benjamin, MacOS product marketing director. “This allows them to leverage one codebase and one development team. Mac Catalyst gives iPad app developers a huge head start and for many, an opportunity to expand their reach onto the Mac platform that they may not have had before. Not only is this great for developers, but it’s also great for Mac users, who benefit with access to a whole new selection of great app experiences from iPad’s vibrant ecosystem.

Meanwhile, Craig Federighi acknowledged issues faced by users with respect to early apps. However, he insists that Catalyst is helping smaller developers to create Mac apps without the need for extensive resources.

While early apps created for Mac with Catalina weren’t well-received by users, the release of MacOS Catalina brought several more to the Mac App Store that seems to have benefitted from more time in development. The technology remains in its infancy, but it has allowed smaller development shops who otherwise wouldn’t have the resources to create Mac apps to do so with relative ease.Tips:

Recover Photos, Videos, Contacts, Messages, Notes, Call History & Calendar from iPhone. Recover Lost or Deleted Data from Your iPhone in Just a Few Clicks. Free Download Now. Download Free Trial Now. Do-It-Yourself Software. 3 Million+ Happy Customer.

Also Read:h33t proxy


Our Take

Apple has added more apps to Mac in macOS Catalina. Meanwhile, the previous apps have updated and are now much more similar to native Mac apps. We have also seen a handful of Catalyst apps from third-party developers and the list includes Crew, PDF Viewer, Crem, Zoho Invoice and more. Hopefully, we should see more developers hopping onto the Catalyst bandwagon and more importantly Apple should sort out the issues related to double subscription.

[Source-CNET]

How to Delete Large Files on Mac And Get More Space? Really Works!


You will find that it can be very difficult to free up space on a full Mac especially when it contains a lot of large files. Getting rid of these annoying big files can help you regain space they are occupying. In this article we will guide you how to delete large files on Mac and recommend some great tools to do the task.
Be Careful About These Large Files on Mac, They Are Eating Your Space!

There are many big files on your Mac that are taking up lots of precious disk space. And first, you need to find out what are the common large files on your device. The items we have listed below are the most common ones. Just check them out one by one and delete them to get your space back.

Movies, music and documents: You may have stored a large number of movies, songs and documents on your Mac and they pile up over time. Just delete those files that you don't like anymore and release more space.

Old photos and videos: Those old photos and videos that you shoot before are also one of the big reasons for low disk space. Get into action now and remove those unwanted ones.

DMG files for installing the application: Everytime you download a new app for your Mac, it often comes with a “.dmg” file. If you have installed a lot of apps on the device, these DMG files are also a big number.


In order to free up space on Mac, you can start with these big files. However, if you find that deleting each type of files is time-consuming, you can also find big files on Mac by using a build-in utility on your device. If you have interest, let’s turn to next part.
How to Locate And Delete Large Size Files on Your Mac Manually

This is the method that you can use on how to locate large files on Mac manually and then delete them without using any third-party tool. Here are the steps to follow:


To start, you will first go to the New Finder window and enter "Command + F" combination to turn to the search bar.


Now, select the “Kind” filter and choose the “other” option. After this, select the "File Size" from the attribute list.


Next is to select the second filter and choose “is greater than” option. Now input the size in the third field to find files that over a number, like 100. Then choose the size either in MB or GB from the last filter in the row.


You will see all the large files that meet that size in the next below. If you want to make sure that your results are not limited, you should make sure to check the “This Mac” sign. Then you can check every folder and sort them by size.


You can decide that you only want to find large-sized files for that period. To do this you will have to make a filter parameter to look for large files permanently by selecting the "Save" button in the upper right-hand side of the screen.


Then select the large file you want to delete and press “Delete”.


In addition to delete big files manually by yourself, you can also decide to use a reliable third-party tool. So, next we will introduce the second method - using a app.
Run Third-Party Utility to Delete Large Files on Mac [Fastest Way]

There is another method that can be used to delete large files on Mac, - to use a third-party utility, which is considered to be the most convenient way to get this done.Tips:

Recover Photos, Videos, Contacts, Messages, Notes, Call History & Calendar from iPhone. Recover Lost or Deleted Data from Your iPhone in Just a Few Clicks. Free Download Now. Download Free Trial Now. Do-It-Yourself Software. 3 Million+ Happy Customer.

Also Read:h33t proxy


Friday 22 February 2019

How to Upgrade to the Latest iTunes Version 2019


1. How to Upgrade to the Latest Version of iTunes 2019

On a Windows computer:


Launch iTunes.


Look at the menu at the top and click Help.


From the drop-down menu that comes up, click Check for Updates.


Follow the instructions on the screen to install the latest update.


On Mac OSX:


Launch iTunes.


Look at the top of your computer screen and click where it says iTunes.


Click Check for Updates.


Follow the on-screen instructions and install the latest version of iTunes.


2. How to Uninstall Old Version of iTunes and Reinstall on Windows 7/8/10
Way 2: Manually Remove iTunes (May Damage PC If Uncorrectly Done)

1. Go to Start and then Control Panel.

2. Click Programs.

3. Click Programs and Features.


4. Uninstall iTunes and related software components in the following order by right-clicking on the program and clicking on Uninstall:


iTunes Software


Quicktime


Apple Software Update


Apple Mobile Device Support


Bonjour


Apple Application Support


Any other programs that are related to iTunes or Apple.

On some systems, iTunes might have two versions of Apple Application Support. Be sure to uninstall both versions.

Note: You can type “apple” in the search bar of Programs and Features to check all the related programs are removed or not.


Second, Reinstall iTunes and Related Components

1. After iTunes is completely uninstalled, restart your computer

2. Download the latest version of iTunes from the official Apple download website.

3. Click on the downloaded file and you should see an installation wizard come up.

4. Follow the instructions and go through the steps of the installation wizard. This will involve agreeing to the terms and conditions, choosing where you want your iTunes folder to be, and a few other things.

5. Click Install.

6. Click Finish when it is done.
3. Remove and Reinstall iTunes and Related Components on Mac

If you have a Mac, uninstalling iTunes is not as easy since it is a built-in application. However, with a bit of extra work, you can also remove iTunes and reinstall it.
First, Uninstall Old Version of iTunes

1. In the Applications folder, locate the iTunes application icon.

2. Right-click on it and choose “Get Info.”

3. Click on the little lock icon on the right bottom corner of the window.

4. Type in the administrator password when prompted.

5. Click where it says Sharing & Permissions.

6. Make sure that “Everyone” is selected in the Read & Write privileges.


7. Drag the iTunes application icon from Application folder to the trash.


Reinstall Latest Version of iTunes

1. Go to the Apple download website and download iTunes.

2. Right click the downloaded file and choose “Open.”

3. An installation wizard should come up. Just follow the on-screen instructions until the application is installed. (Agree to the terms of service, choose a location for your folder, and so on.)Sponsor ads:

Gihosoft Free iPhone Data Recovery:iphonerecovery.com

Free iPhone Data Recovery Software for Windows/Mac

Recover up to 12+ types of files, including contacts, SMS, photos, WhatsApp, Viber, notes, etc.

Restore lost data from iOS devices directly or from iTunes and iCloud backup

Recover iPhone data lost due to iOS upgrade/jailbreak, accidental deletion, device lost or broken

Support all the latest iPhone, iPad and iPod Touch

Both Free and Pro version.

If you lost data after you updated to a new iPhone, you can always use Gihosoft iPhone Data Recovery to get the data back from the old iPhone or backup.

Top 10 Best FRP Bypass Tools to Bypass Google Account on Android Device 2019

Worth reading:download youtube 1080p

If you use android phones, please choose Gihosoft Android Data Recovery

Jihosoft Android Data Recovery: the best Android Data Recovery software for Windows and Mac to recover deleted contacts, messages, photos, videos, WhatsApp and etc from Android

How to Share iTunes Music Between iPhones via iTunes 2019

How to Share iTunes Music Between iPhones via iTunes 2019
How to Share iTunes Music Between iPhones via iTunes

The first way to share iTunes music between two iPhones is to use iTunes. On the surface, this seems pretty simple: you just transfer your music from one device to iTunes, then from iTunes to your second device. In practice, it’s not so easy and you will probably run into several restrictions. Either way, this is how you do it:

Music from First iPhone to iTunes:

1. Connect your first iPhone to your computer and launch iTunes.

2. Go to “Files > Devices > Transfer Purchases from [device name]”. Then the purchased items will be transferred from your iPhone to iTunes library.


Music from iTunes to Second iPhone:

3. Unplug your iPhone. Plug in the second iPhone and click on the device icon on iTunes.

4. On the left side, click Music where you see it in the list of different types of content.

5. Choose “Music” from the left side. Check the box next to Sync Music.

6. Select the music files that you want to sync. Click Apply.


If you get a message that pops up telling you that this iPhone is associated with another library, you will have to give iTunes permission to delete what’s on the iPhone and overwrite it with the new library. You can’t sync your iPhone with more than one library at a time.

Limits:


When syncing, existing music library on iPhone gets deleted when the new one is added. You can’t add more music without deleting the old music, in other words.


If your second iPhone is associated with another library, when syncing, the second iPhone will be erased.


It only supports to share purchased iTunes music across devices.


iTunes is limited to work with 5 iOS devices.Sponsor ads:


Gihosoft Free iPhone Data Recovery:iphonerecovery.com


Free iPhone Data Recovery Software for Windows/Mac


Recover up to 12+ types of files, including contacts, SMS, photos, WhatsApp, Viber, notes, etc.


Restore lost data from iOS devices directly or from iTunes and iCloud backup


Recover iPhone data lost due to iOS upgrade/jailbreak, accidental deletion, device lost or broken


Support all the latest iPhone, iPad and iPod Touch


Both Free and Pro version.


If you lost data after you updated to a new iPhone, you can always use Gihosoft iPhone Data Recovery to get the data back from the old iPhone or backup.


Top 10 Best FRP Bypass Tools to Bypass Google Account on Android Device 2019


Worth reading:download youtube 1080p


If you use android phones, please choose Gihosoft Android Data Recovery


Jihosoft Android Data Recovery: the best Android Data Recovery software for Windows and Mac to recover deleted contacts, messages, photos, videos, WhatsApp and etc from Android

Thursday 21 February 2019

Back-up iTunes Library Manually – A Little Complex 2019


Back-up iTunes Library Manually – A Little Complex

Before going into the details of the alternative apps, it is worthwhile to consider as to how you can back up your iTunes library manually so that it does not get lost or damaged.

In order to create a backup of your iTunes library, you will firstly need to locate your iTunes library folder in your system.


For Windows 7 and later versions, you will need to go to C:\Users\username\My Music\iTunes\.


For Mac, on the other hand, you will have to go to Finder and then choose Go > Home > Music > iTunes.

If, by any chance, you do not find the iTunes Folder in these default locations, then follow the steps mentioned below to locate the folder.

Step 1. Launch iTunes and go to iTunes Library

Step 2. Select a file in the library and then select Edit > Get Info.

Step 3. Click on the File tab. The location of the file will appear below.


After you have located the folder, simply copy and paste the entire folder to the backup source.

Sponsor ads:

Gihosoft Free iPhone Data Recovery:iphonerecovery.com

Free iPhone Data Recovery Software for Windows/Mac

Recover up to 12+ types of files, including contacts, SMS, photos, WhatsApp, Viber, notes, etc.

Restore lost data from iOS devices directly or from iTunes and iCloud backup

Recover iPhone data lost due to iOS upgrade/jailbreak, accidental deletion, device lost or broken

Support all the latest iPhone, iPad and iPod Touch

Both Free and Pro version.

If you lost data after you updated to a new iPhone, you can always use Gihosoft iPhone Data Recovery to get the data back from the old iPhone or backup.

Top 10 Best FRP Bypass Tools to Bypass Google Account on Android Device 2019

Worth reading:download youtube 1080p

If you use android phones, please choose Gihosoft Android Data Recovery


Jihosoft Android Data Recovery: the best Android Data Recovery software for Windows and Mac to recover deleted contacts, messages, photos, videos, WhatsApp and etc from Android

Sunday 12 August 2018

SLICES 2 – PARALLEL SPACE ALTERNATIVE FOR IPHONE 2019 Guide


SLICES 2 – PARALLEL SPACE ALTERNATIVE FOR IPHONE


Many of us use multiple social media accounts for work, family, etc. Switching manually through multiple accounts is a hassle on the stock operating system and often results in the loss or overwriting of data. That is where this new tweak comes in.


Slices 2 allows you to create multiple data bundles for user apps on iOS 11. Originally developed by software engineer Stergios Hetelekides, this classic tweak is now managed by newcomer Subdiox.


You can easily switch between various slices (data bundles) and what’s more, each of these slices has a completely different storage area.


For those of you who are unfamiliar with the tweak, it’s essentially a Parallel Space or 2Accounts alternative for Apple devices.


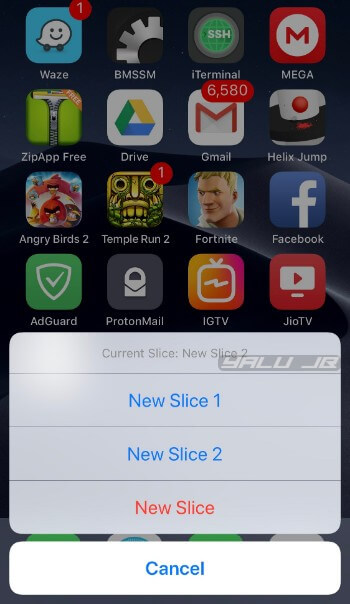
Here’s how it looks like in action.You may also like:


jihosoft file recovery


Gihosoft Free Android Data Recovery can help you easily recover lost data such as photos, videos, contacts, text messages, WhatsApp & Viber chats from Google Pixel/XL or other Android phones effortlessly.


Report this ad


WHAT ARE THE BENEFITS OF INSTALLING SLICES 2?
1. SWITCH BETWEEN MULTIPLE SOCIAL MEDIA ACCOUNTS


As mentioned above, Slices 2 lets you switch between multiple Facebook, Instagram, and other social accounts.


You no longer need to manually sign out of your current account and log in with another account.


Just set your slices up correctly and you will be able to log in with just a few taps.
2. DEVICE SHARING MADE SIMPLE


If you often share your device with your peers, you can set up a new slice specifically for their account.


This will prevent them from overwriting your top scores and ensure your progress remains intact.
3. GET FIRST-TIME USER PROMO CODES


You can also use Slices jailbreak tweak to create multiple accounts on an app, such as Uber, that doles out promo codes.


Once you burn your original discount code, you can create a new account and avail new coupons provided the app doesn’t store your device ID or any other unique identifier.


Apart from the aforementioned advantages, Slices 2 offers nothing except for better support as compared to its predecessor.
COMPATIBILITY
DEVICES
IPHONE


iPhone SE, iPhone 5s


iPhone 6s, iPhone 6


iPhone 6s plus, iPhone 6 plus


iPhone 8, iPhone 7


iPhone 8 plus, iPhone 7 plus


iPhone X
IPAD


iPad Air, iPad mini 2


iPad mini 4, iPad Air 2, iPad mini 3


iPad (5th generation), iPad (6th generation)


iPad Pro (9.7‑inch)


iPad Pro (12.9‑inch)


iPad Pro (10.5-inch), iPad Pro (12.9-inch) (2nd generation)
IPOD


iPod touch (6th generation)
APPLICATIONS AND GAMES


The latest update of Slices is compatible with almost all user apps. On my iPhone, it works splendidly with narwhal for Reddit and lets me switch between multiple Reddit accounts in a jiffy.


With that being said, there are a few apps that it doesn’t support (yet). Here’s the complete list of applications that are incompatible as of right now.


Discord (crashes immediately)


Mega


Snapchat


Telegram


Whatsapp
REQUIREMENTS


iPhone, iPad, or iPod touch


iOS 8-11 firmware


Electra jailbreak


Cydia
HOW TO USE MULTIPLE USER AND GAME CENTER ACCOUNTS IN APPS USING SLICES 2
INSTALLATION


Step 1 Open Cydia and go to the Sources tab.


Step 2 Tap Edit > Add and input the URL of Subdiox’s Cydia repository (http://subdiox.com/cydia).


Step 3 Go to the Search tab and search for “Slices 2”.


Step 4 Install the latest version of this tweak from its original source.
CONFIGURATION


Now that you have installed Slices on your iPhone or iPad, you must configure and set it up properly. This section will walk you through the setup process.


Step 5 Open the Settings app and open the preferences section of Slices 2.


Step 6 Toggle on Enabled (if it’s disabled by default).


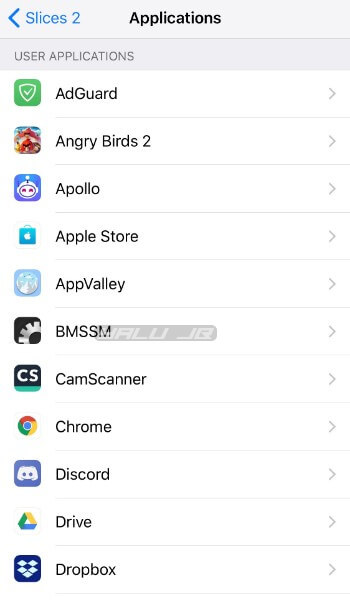
Step 7 Tap Applications and select the app you want to use multiple user accounts with. I will use narwhal for demonstration purposes.


Step 8 Tap Create Slice and enter its name. For example, you can name the very first slice “New Slice 1”. Generally, this slice is associated with your default account or the account that you use the most with the selected app.You may also like:


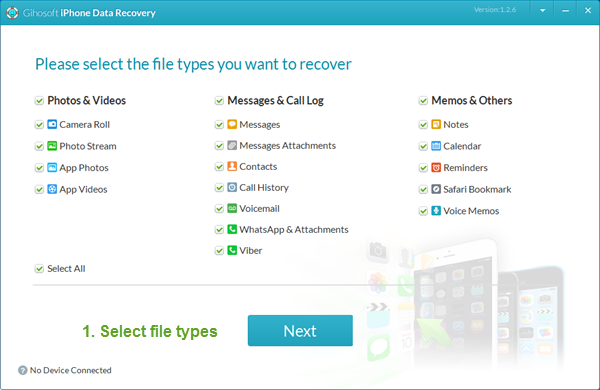
If you ever lost or accidentally deleted data from your iOS device, you can use the professional Gihosoft iPhone Data Recovery software to retrieve important data from iPhone, iPad or iPod Touch even without backup.


Jihosoft iPhone Backup Extractor Extract and recover all types of data from iPhone backup files, such as camera roll photos, videos, SMS, contacts, reminders, WhatsApp, and etc.


Report this ad


Step 9 Now that you have created your default slice, you can now create another slice. Tap Create Slice again and add another slice.


Step 10 Ensure that the Ask on Touch option is enabled. If it is toggled on, Slices 2 will display the slice list for a specific app when you launch it.


Step 11 Set up your default slice from the Default Slice section. By default, Slices 2 will use the first slice as your default slice.


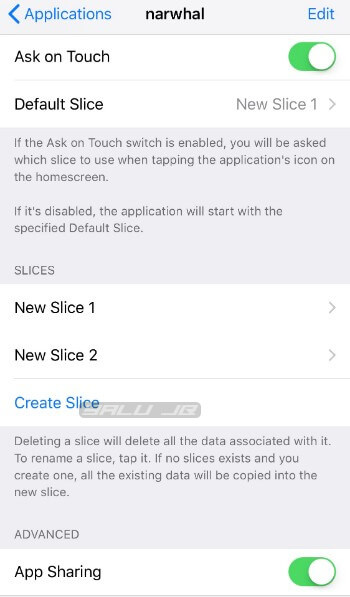
Step 12 Ensure App Sharing option is toggled on. What this option does is, it leaves the data shared with other apps “as is”. Enabling this option will ensure that your app data remains intact.
USAGE


Step 13 Tap the icon of the app you want to launch and select the desired slice.


Step 14 Sign in with your default user account for the first slice.


Step 15 Repeat the aforementioned steps for the other slices as well.


Step 16 Once you log into your accounts with your slices, you can use them to log into an account instantly by tapping its associated slice.
ADVANCED OPTIONS


You can also create a new slice on-the-fly. Simply tap the New Slice button after you launch an app to add a new slice to the roster. If this button doesn’t appear when you launch an app, go to the preferences section of Slices 2 and add enable Show New Slice Option.


You can add multiple game center accounts from the Accounts section in the preferences. To add a new Game Center account, you must sign in with your Apple ID credentials.
KNOWN ISSUES AND BUGS


As of now, this tweak is still in beta development stage and a few features are amiss or don’t work properly. Hopefully, the developer will fix these in the upcoming builds.


Slices 2 doesn’t support multiple Apple ID accounts for App Store. The developer may add this feature in future versions.

Saturday 11 August 2018

How to Go back from High Sierra to Sierra without Data Loss?


How to Go back from High Sierra to Sierra without Data Loss?


Part 1. Why do You Downgrade macOS High Sierra?


As with most technological advancements, immediately after the buzz and yielding to the hype of certain new gadgets, features, apps or operating features, we easily get bored, annoyed or outrightly regret being over expectant of the promised deliverables. We have gleaned and highlighted some of the most common reasons why users inquired the “how to downgrade from high sierra” issue below:


1. macOS Sierra Tested Apps


Certain Mac users frequently engage in testing apps and this often leaves them latched onto a particular OS, hence having applications that are compatible only with that OS e.g. macOS Sierra. These users would ultimately not be open to searching for other High Sierra compatible applications, instead, they would research how to downgrade from high sierra.


Alternatively, there is another approach to solving this downgrading issue, to allow for dual use of both the Sierra and High Sierra. It is possible to establish dual boot on your Mac which enables your device run both operating systems simultaneously. Sadly, this could be considered too cumbersome for the majority of Mac users.


2. MacOS High Sierra Beta was an overkill


Most users that used the Bet version encountered countless bugs and glitches that became so complicated and deterred them from partaking any further. Moreover, the constant glitches led various apps to malfunction and “have a mind of their own” which makes achieving any valuable result practically impossible.


3. High Sierra’s non-support of 32-bits architecture apps


The third reason users cite as their reason for requesting how to downgrade from high sierra is owed to the non-support of 32-bit architecture applications starting with the macOS High Sierra release. Some users complain of their favorite or most needed applications being stuck in the 32-bits framework, hence fueling their move to downgrade.


Part 2. How to Downgrade from macOS High Sierra to Sierra?


The first and critical step every Mac user must take before proceeding with the downgrade to Mac Sierra is that you must back up your Mac via the Time Machine.


Back up Mac on Time Machine


1. Click the Apple Menu.


2. Select System Preferences.


3. Click the Time Machine tab.


Once your downgrade is completed, your data can be restored onto your Mac from the Time Machine. To downgrade the macOS, click the following:


Erase macOS High Sierra


Follow the steps below:


1. In the top-left screen corner, tap the Apple icon and choose the Restart option.


2. While your Mac proceeds with the restart, long press Command + R.


3. When the OS X Utilities pops up, select the Disk Utility option.


4. Choose Continue then select Startup Disk from the following prompt.


5. Hereafter, select the Erase option. Afterward, input the name of the file to be deleted with your keyboard e.g. macOS High Sierra.


6. In the Format list that appears, choose Mac OS Extended and tap Erase.


Exit the Disk Utility once done with the erase and proceed to the next procedure.


Reinstall macOS Sierra


1. On your macOS Sierra Installer, select the OS X Utilities.


2. Select the Reinstall OS X option and click Continue to commence the reinstallation.


Once the terms and conditions appear, agree with them and complete the reinstallation.


Restore Time Machine Data to your Mac


Once your Mac has finished the reinstallation, it would restart automatically. Follow the following procedure to proceed with the “how to downgrade from high sierra” solution.


1. Initiate a Mac restart, during which you long press the Command + R buttons.


2. Access the OS X Utilities menu and select the Time Machine Backup. Click Restore and Continue.


3. Read the Restore Your System page, tap Continue.


4. Select the Time Machine Backup and tap Continue.


5. Choose your most up-to-date backup and tap Continue.


Part 3: How to Rollback further from macOS High Sierra?


To downgrade or roll back your macOS to a version prior to Sierra, you would need to have backed up the previous version using your Time Machine. This backing up method is highly recommended to Mac users as it saves a ton of future frustration and annoyance. To proceed with the downgrade, follow the steps below:


1. While restarting your Mac, long press Command + R.


2. Tap the “Restore from a Time Machine Backup” from the Disk Utility option.


3. Select your preferred Time Machine Backup disk and target disk.


4. Follow the prompts by clicking Continue.


It is important to note that the downgrading process is usually time-consuming and would require a great deal of patience from users. Although the link to download Sierra would most often not be on your purchased list, Apple maintains a somewhat covert link to the Sierra macOS to cater for users experiencing irreconcilable issues when trying to run the macOS High Sierra.


If you lost videos from iOS Camerall Roll which are nowhere to download again, you can use Gihosoft iPhone Data Recovery to get back deleted videos from iOS device including iPhone, iPad and iPod Touch.

Apple Wants to Help Project Catalyst Developers with More Support, Resources

macOS Catalina was launched to the public earlier this month. The latest macOS arrives with Mac Catalyst for everyone. Project Catalyst is ...